Monday, April 23, 2012

A Trip to the Dells

A trip the Dells was in order this spring, as we headed to the Great Wolf Lodge. Because we went off season, we lucked out with some great prices – and a relatively quiet water park!

Our little  buddy has gotten to be a great traveler in the car! Arriving early on a Thursday evening, we were delighted to discover a very large hotel room, complete with a fireplace - a definite plus on a dreary, damp weekend!

IMG_2693

Almost immediately, we headed to the indoor waterpark – any worries I had about Gavin being scared were quickly diminished. He loved every second of it!

IMG_2711IMG_2713IMG_2712

IMG_2694IMG_2695

IMG_2698IMG_2697IMG_2699IMG_2703
IMG_2710IMG_2709
IMG_2764IMG_2719

Amidst the three days of fun in the water, we headed next door to Knuckleheads – and enjoyed a mini indoor theme park & arcade…most of which we had to ourselves! Hitting those couple of weeks between spring break & summer break was perfect!

IMG_2720IMG_2724IMG_2727IMG_2743IMG_2733IMG_2740IMG_2749
IMG_2751IMG_2752

Needless to say, after story time provided by the hotel (for all of the kids) – our nights went quickly from this…

IMG_2757

To this…

IMG_2759

And like the good little CF’er that he is – morning and evening treatments came right along with us on vacation

IMG_2760

True to Wisconsin Dells form – we enjoyed a brief moment of sunshine with a ride on the famous Ducks. While Gavin was infatuated with the fact that a vehicle could travel on both land & water – Casey and I enjoyed the scenery. The quick trip was a bit chilly, but worth it! We didn’t even have to stand in line!

IMG_2765IMG_2769IMG_2773

This quick getaway was pure perfection for our family of three – we had a blast and cannot wait to head back to the Dells again!

A few more highlights…

A conversation & a snack with Daddy

IMG_2781IMG_2782IMG_2783IMG_2784IMG_2785IMG_2786

Snuggles with Mommy at story time in the lobby

IMG_2790IMG_2793

Feeding deer at the local deer park

IMG_2810IMG_2831IMG_2832IMG_2833IMG_2836IMG_2838

Tuesday, April 17, 2012

Just Sayin’ a Thank You

Being the mom of a child with extra needs has it’s challenges. Duh. Well, you’d think that it would be “duh…”

But today, I would like to say thank you to that handful of friends who have stuck by me through this crazy rollercoaster Cystic Fibrosis has brought us on. The one’s who realize that my life has gotten to a new level of “crazy busy.”

That on top of regular life, we have at least an hour a day of treatments & CF care that needs to be attended to. Not including the piles of pills and medicines we feed to our child every day. What we wouldn’t do for that extra hour in the day…

That on top of regular bills, on a weekly (if not daily) basis we receive medical bills – bills that stress us out, and will have no end.

That on top of regular life, we spend hours and hours on the phone with insurance companies because “someone coded something incorrectly.”

That on top of regular life, we make the drive to visit Gavin’s medical team over and over again, keeping him as healthy as possible.

That on top of regular life, we’d love to add to our family, but the threat of CF round two is just too scary. And we don’t have the 20 grand laying around to go through with IVF.

That on top of regular life, when you have a child with extra needs – your social life takes a back seat. There aren’t enough hours in the day sometimes to return that phone call, that text, that email AND accomplish what needs to be done – and if you or we are sick, we’ll be missing that get together. That before you know it, a month has gone by and you haven’t even had a moment to sit down and chat.

That on top of regular life, we spend our time trying to raise every penny possible to find that cure for our child. To shout from the top of rooftops, trying to make CF a household name – more awareness gets us closer to that cure.

When Gavin was first diagnosed, I would read many stories of people losing “friends.” That many people “disappeared” not wanting to hear of the difficulties, and never understanding or trying to understand how much extra work truly goes into Gavin’s health. I was convinced that wouldn’t be us. I couldn’t imagine one person that didn’t or wouldn’t get it. But, well…almost 3 1/2 years in I stand corrected. There have been those that have disappeared. There are those that don’t want to hear about our difficulties. Those that – when you really, really need them – disappear into the woodwork. And then there are those who I haven’t seen or spoken to in over a decade, who have jumped forward and let me know that they are there – that they care, and they’re willing to help. Surprising how life works itself out.

So THANK  YOU to my amazing friends who have stuck by my side. The ones who have never judged, never questioned, but have just been there. I appreciate it more than you know. You know who you are :)

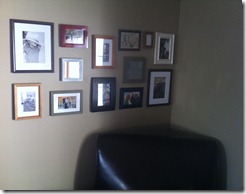
Simple, cheap wall décor (thank you Pinterest!)

If you’re friends with me on Facebook, you’ll know that I have a extreme obsession with Pinterest.  Whether it’s food, crafts, home décor etc., I love finding new (and inexpensive!) ideas.

This past weekend I combined two Pinterest finds to fill an empty corner of wall space. And per the suggestion of a high school friend, I’ll post my own “how to” here!

On Saturday (and an extra trip on Sunday) I hit up our local Goodwill, Savers, & Salvation Army to find an array of picture frames to begin my own “cozy corner” (Pinterest find #1)

- Make sure that the  frames have a way to be hung on the wall (or you’ll have to add hardware), and that the picture can easily be changed out! Also make sure the glass is in good condition, and not all scratched up. This will save you both time and money!

The most I spent on a frame was $1.99, but the majority were just fifty cents or less. If you have random frames at home, this part won’t cost you a penny! The finish did not matter to me, but the “texture” of the frame did so that I could have the look of a collection made over the years, not a bunch of very similar finishes. I knew that a coat of spray paint could easily be used to change the look, and I added some white matting to a random few.

My first step was to measure how high and wide I wanted the décor to be.

IMG_2635

I chose to go 45” across on the left wall, and wrapped around into the other corner, going 35” across and both are 21” high. I marked off the bottom edge of where my pictures would be hung using painters tape (I first marked the wall using a yard stick and a level to make sure it was straight!).  This way I could play around with how high/low I wanted the frames to be hung before putting in any nails!

Then, I laid out the frames on my garage floor, so that I could figure out what layout “looked right.” I did not get a picture of this (sorry) but using painter’s tape on the ground, I framed out the size of the layout and moved the frames around within that taped off space  until I got the look I wanted. If you do a corner like I did, make sure that you “balance out” both of the walls. I didn’t measure out the spacing, I just did it by eye. I did line up the edges of some of the frames, which was much more pleasing to the eye!

Once you have your layout – TAKE A DIGITAL PICTURE! That way when you move the frames around to paint, or to bring inside/hang on the wall etc. you have a document of how you had it laid out!

Choose which frames you’d like to paint (make sure to clean & sand!), and which ones are ok as is. I left several in the original finishes, but made sure that no similar colors or shades were next to each other. If I painted one a color, I made sure there was another in a similar shade, and balanced them out between the two walls (i.e. a red frame toward the top left of one side, balances well with a red frame toward the bottom right on the other). If I painted two frames the same color, the size/shape/texture of those two frames  did not have to match – but I wanted the colors to look balanced and to have some cohesion with the colors throughout the rest of our upstairs.

While my painted frames were drying, I went inside (and used #2 Pinterest idea) to cut out wax paper the size of my layout. I had to use two sheets of paper and taped them together to get my 21” height. Make sure you tape it with transparent tape!

Once my frames were dry, I brought them inside and laid them out onto the wax paper. You’ll notice that my vertical edges are not straight – because I didn’t need an exact width I just made sure the outer frames lined up, but if you are restricted to a certain width I’d made sure your edges of wax paper are squared. (The image below is actually before I had painted a few of my frames – but you get the gist)

IMG_2647

Now, trace around each of the frames (I used a sharpie a regular pen doesn’t leave much of a line). Once all of the frames were traced, I flipped each individually over and marked where the nail hole needed to be. Because the wax paper is transparent, this is easy peasy! (Another good reason to have an image of your layout! you don’t have to remember which frame went where!)

Once you have marked all nail holes for all frames, line  up the bottom edge of your wax paper, with the taped line you have on your wall and tape the paper to hold in place. Depending on how large your area is, you made need an extra set of hands.

IMG_2643much easier to see in person!

Pound a nail into each of the marks, tear away the wax paper, hang your pictures and you’re DONE! For each individual wall it took me about 10 minutes to trace, mark, hammer and hang! No headaches, no muss & fuss!

IMG_2643IMG_2644IMG_2649

This wax paper technique is great for many pictures, or just one! I always hated trying to line up a frame that needed multiple nails, to get it to hang straight! This will take out all of the measuring, all you need is a leveled line!

I had so many pictures I loved of Gavin stashed away, and I love that I can now have many of them out on display (although I did mix in some of Gavin’s artwork). As I poured through pictures, I realized that Gavin has had his photo taken by a LOT of professional photographers!

IMG_2653

These photos were taken with my phone, and I think it’s far better in person than in these images – but it gets the point across!

IMG_2651IMG_2652

p.s. many stores will sell kits to keep your pictures hanging straight, I just use a bit of painter’s tape, roll it so it sticks to the wall and to the frame…viola, no more crooked pictures and no harm done to either the frame or wall!
Monday, April 9, 2012

Easter Recap

Hope that everyone had a fantastic Easter! It’s hard to believe that yet another holiday has come and gone – time is flying by much too quickly!

Last week Gavin and I picked out a new playhouse. I gave him a range of options and this is the one he settled on. I love that it also includes a mini kitchen and workbench. His favorite part was the picket fence & flower box – they are kid sized screws (the set comes with toy tools) and he is able to attach or detach the fence posts & flower box on the door by himself.

IMG_2535IMG_2532

He was very proud of himself for being able to “help” while Casey and I put on the last finishing touches.

IMG_2536

Once it was completed, we had one happy little guy. So happy, that he performed his own happy dance.

IMG_2540IMG_2541IMG_2542IMG_2543IMG_2544IMG_2546

We spent Easter weekend at my mom’s place – and snuck in a trip to the Mall of America. We didn’t tell Gavin that we were headed there – and just pulled into the parking ramp. As I got him out of his car seat, I could just see the light bulb go off.

Gavin: Mama, are we at the BIG mall?
Me: Yep!
Gavin: The one with my favorite rides?!?!
Me: Yep!
Gavin: We are at the MALL OF AMERICAAAAAAAAAA! Daddy & Oma, we’re at the Mall of Americaaaaaa!

IMG_2549

The Easter bunny found his way to us at my mom’s house. Gavin was determined that he had heard him, but by the time he came to check, the Easter bunny had already hopped away. Nonetheless, we had one very spoiled little boy!

IMG_2550


And no worries, Gavin is very aware of the real meaning of the holiday! He will tell you all about Jesus, Heaven, and God if you ask (including the list of people he knows that are living with God in Heaven right now)

By 7 am, he was already into the candy. Talk about a nutritious breakfast!

IMG_2557IMG_2558IMG_2562

We continued on with our second annual brunch and bowling, Easter celebration. Because, you know, nothing says Easter like a couple rounds of knocking over pins!

IMG_2576

Tuesday, March 27, 2012

GREAT STRIDES!

Great Strides

It’s that time of year again! On May 5th, we will be walking in our local Great Strides Walk, raising money for the Cystic Fibrosis Foundation.

This is the first year we are walking in Rochester, which is a much smaller walk, and we’d like to make a big impact in our first year!

So PLEASE, take a moment of your time and donate to our cause. In the mere three years we’ve been in this battle, SO many amazing things have happened. And it’s all because of generous people like YOU!

Your donated dollars have made Kalydeco possible, a LIFE CHANGING medication that will soon be in our son’s hands. But our battle is so far from over. Until every last ounce of this disease is out of Gavin’s body – we will be fighting this fight.

Someday CF will stand for Cure Found. And we need YOUR help to get there.

Please click the image above to donate! (If you are not comfortable donating online, please get a hold of me for my personal address.)